 |
| source. |
It's that time of year again! The (completely unofficial) Pinterest Challenge thought up by Sherry & Katie to stop dreaming (and pinning) and start doing!
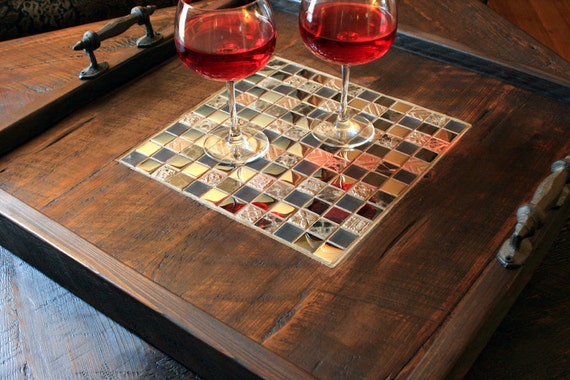
My project this go around is a mosaic tile serving tray. We recently traded in our hideous, beat up, dog chewed coffee table for a cute pale gray & white chevron storage ottoman. The problem? We eat dinner in front of the TV, and the ottoman isn't quite as useful as the coffee table for that. Especially with a cat who likes to knock drinks over and a crazy dog. So, we needed a tray to set our drinks in, hold remotes & hair ties, and all that jazz.
My search for one did not turn out well. All of the ones I found were really cheaply made, and I knew the second Buddy pawed at it, he'd manage to knock it off the ottoman. I wanted something sturdier, without paying a fortune, so I decided to make something myself. Partly because I wanted something sturdy & well made. Partly because I wanted an excuse to buy this gorgeous mosaic tile from Home Depot I had been coveting (the picture does not do justice to this tile, btw).
The Inspiration:
 |
| This beauty definitely inspired me. But $265? No thank you. |
 |
| A little more budget friendly. $54.75 |
 |
| A crafty, DIY version... |
My Project:
I told Graham roughly what size I was wanting my tray to be, and he cut me some pieces from scraps of his wood pile. The free wood definitely helped offset the cost of the tile. I needed a small square to fill in the edges, since the tile I selected was staggered. I didn't want to deal with a tile cutter, so I found a sheet of square tiles that matched the color scheme and used that to fill in at the ends.
Two coats of stain later, and I had a color I was pleased with. The stain was also free. It was leftover from our entertainment center project.
Cover the wood with a coat of satin polyurethane. This was also free, since it was leftover from the entertainment center. The texture was rough though after one coat, so I gave a quick sand and put down a second coat.
I also used wood glue as my adhesive to stick the tile to the bottom of the tray. I did not put poly in the side I was sticking the tile to, because apparently glue doesn't stick to poly. I figured it didn't really matter how that piece looked, since it was going to be covered in grout anyways.
I picked out some fun hardware for the handles at Lowes. I loved that the squareness in these kind of mimicked the shape of the tile.
Grouting was way, way easier than I thought it would be. I put it off for ages, but it seriously took about 15 minutes. It was slightly messy, but not bad at all. Now I'm ready to tackle a back splash ;)
Once the grout and polyurethane was dry, Graham put it together using his Kreg and drilling pocket holes. This thing is really, REALLY secure, which is a must since it weighs a TON!
A few tips & tricks:
- Wait till the tile is grouted before attaching the sides. Grout is messy, and I didn't want to mess up the sides during the gluing or grouting process.
- Use a soft cloth to apply the polyurethane. I used a foam brush for the first coat and the texture was really rough. The second coat was applied with a piece of an old t-shirt and it was super smooth & polished.
- They make a combination adhesive/grout. If I had known about that, I would have bought that instead of using wood glue & grout.
So, the cost breakdown of this:
Tile: $16.80
Grout: $8.70 (SO. MUCH. GROUT. LEFT.)
Hardware: $6.24
Grout Float: $4.03
Wood glue: Already had
Stain: Already had
Polyurethane: Already had
Grand Total: $35.77
***Home Depot & Lowes offer a 10% military discount, which is why there may be discrepancies between my stated price and the prices online. My total though factors in the discounted price.
So definitely not the cheapest project ever, but the cheap, already damaged one I saw at Hobby Lobby was $20 (on sale). The rest of the ones I saw were a heavy plastic. I wanted something made of real wood, sturdy and something I knew would last for a while, and I couldn't be more pleased with how this turned out. Not to mention I have tile left, grout left, and I still have the float, so if I decide to make another one it won't be nearly as pricey.


i love the tiles you chose!
ReplyDeleteThank you! I eventually want to do a kitchen backsplash in them. They're so pretty in person.
Delete