photo recipes-1.png  photo wedding.png  photo homeprojects.png  photo blogroll.png  photo travel-1.png
Showing posts with label Pinterest. Show all posts

Wednesday, May 8, 2013

DIY Mosaic Tile Tray

source.

It's that time of year again! The (completely unofficial) Pinterest Challenge thought up by Sherry & Katie to stop dreaming (and pinning) and start doing!

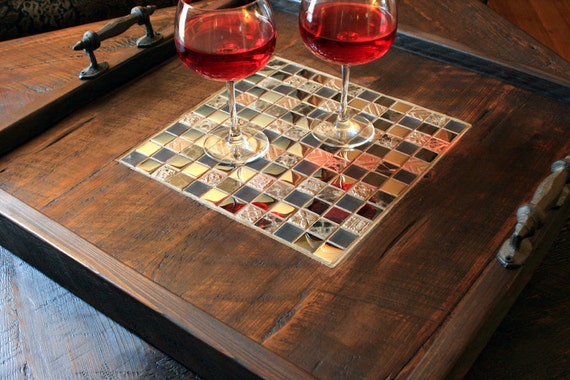
My project this go around is a mosaic tile serving tray. We recently traded in our hideous, beat up, dog chewed coffee table for a cute pale gray & white chevron storage ottoman. The problem? We eat dinner in front of the TV, and the ottoman isn't quite as useful as the coffee table for that. Especially with a cat who likes to knock drinks over and a crazy dog. So, we needed a tray to set our drinks in, hold remotes & hair ties, and all that jazz.


My search for one did not turn out well. All of the ones I found were really cheaply made, and I knew the second Buddy pawed at it, he'd manage to knock it off the ottoman. I wanted something sturdier, without paying a fortune, so I decided to make something myself. Partly because I wanted something sturdy & well made. Partly because I wanted an excuse to buy this gorgeous mosaic tile from Home Depot I had been coveting (the picture does not do justice to this tile, btw).

The Inspiration:
This beauty definitely inspired me. But $265? No thank you. 
A little more budget friendly. $54.75
A crafty, DIY version...

My Project:

I told Graham roughly what size I was wanting my tray to be, and he cut me some pieces from scraps of his wood pile. The free wood definitely helped offset the cost of the tile. I needed a small square to fill in the edges, since the tile I selected was staggered. I didn't want to deal with a tile cutter, so I found a sheet of square tiles that matched the color scheme and used that to fill in at the ends.


Two coats of stain later, and I had a color I was pleased with. The stain was also free. It was leftover from our entertainment center project

Cover the wood with a coat of satin polyurethane. This was also free, since it was leftover from the entertainment center. The texture was rough though after one coat, so I gave a quick sand and put down a second coat.  

I also used wood glue as my adhesive to stick the tile to the bottom of the tray. I did not put poly in the side I was sticking the tile to, because apparently glue doesn't stick to poly. I figured it didn't really matter how that piece looked, since it was going to be covered in grout anyways. 

I picked out some fun hardware for the handles at Lowes. I loved that the squareness in these kind of mimicked the shape of the tile. 

Grouting was way, way easier than I thought it would be. I put it off for ages, but it seriously took about 15 minutes. It was slightly messy, but not bad at all. Now I'm ready to tackle a back splash ;)

Once the grout and polyurethane was dry, Graham put it together using his Kreg and drilling pocket holes. This thing is really, REALLY secure, which is a must since it weighs a TON!

A few tips & tricks:

  1. Wait till the tile is grouted before attaching the sides. Grout is messy, and I didn't want to mess up the sides during the gluing or grouting process. 
  2. Use a soft cloth to apply the polyurethane. I used a foam brush for the first coat and the texture was really rough. The second coat was applied with a piece of an old t-shirt and it was super smooth & polished. 
  3. They make a combination adhesive/grout. If I had known about that, I would have bought that instead of using wood glue & grout. 


So, the cost breakdown of this:
Tile: $16.80
Grout: $8.70 (SO. MUCH. GROUT. LEFT.)
Hardware: $6.24
Grout Float: $4.03
Wood glue: Already had
Stain: Already had
Polyurethane: Already had

Grand Total: $35.77
***Home Depot & Lowes offer a 10% military discount, which is why there may be discrepancies between my stated price and the prices online. My total though factors in the discounted price.

So definitely not the cheapest project ever, but the cheap, already damaged one I saw at Hobby Lobby was $20 (on sale). The rest of the ones I saw were a heavy plastic. I wanted something made of real wood, sturdy and something I knew would last for a while, and I couldn't be more pleased with how this turned out. Not to mention I have tile left, grout left, and I still have the float, so if I decide to make another one it won't be nearly as pricey.

Wednesday, March 14, 2012

DIY Upholstered Mirror


Last week Sherry over at Young House Love posted about a winter edition Pinterest Challenge. I had a few things I needed motivation to get done, so I jumped on it, which is the whole point of the challenge. To stop just pinning and start doing. Some of the things I needed to do were just convincing my husband to drill some holes into a perfectly painted wall and hang stuff (see my Pin-spired towel rack here =)). Others required more work on my part. Like this upholstered mirror. 

I saw this mirror on House of Turquoise a few weeks ago and I LOVED it. But at $395, the price tag was a little out of my budget.


So, I decided to take advantage of my husband's garage full of power tools and make a cute & colorful mirror myself.

This one is upholstered in leather. I didn't want to use leather, because I wanted it to be simple & inexpensive. I went to Hancock Fabric and strolled the aisles. I finally decided on this cheerful yellow and gray striped fabric I've been admiring for MONTHS. Seriously. Every time I go to the fabric store I'm tempted to buy a few yards if it, and then I remember that we have no yellow anywhere in our home. I figure the yellow would work perfect in our neutral foyer, where the only other color is a dark blue.

We still need a new front door... a blue one =)

This project was SO inexpensive and easy to do. Graham built the frame out of some wood remnants he had from other projects, but any inexpensive wood would work. Since I was going to cover it in fabric, I didn't need the texture of the wood to be smooth.

First, I cut out a piece of fabric to cover the frame with about two inches of overhang on each side. One yard would be MORE than enough fabric for this project.


Next, I sprayed a thin layer of spray adhesive over the frame and adhered a layer of crib sized loft batting to the wood.


Once the glue was dry and the frame was covered in the batting, I laid the frame (batting side down) on the back side of the frame. Pulling the fabric tight, I then stapled it with a staple gun to the back of the frame.


When this is done on all four sides, cut the inside out, and staple the flaps to the back of the frame. This was harder than I anticipated, and I ended up having to pull it back up and put down little pieces of the fabric in each corner to keep the wood from showing. If anyone else does this and figures out a good way to do the middle, please let me know!

But, problems aside, I love how this turned out.


I love the lines, and I love the little bit of softness that the batting gives it. It looks plush and curvy up against the striped walls. And it's a far cry from the original $5.99 mirror from Target.

Price Breakdown:
Mirror: $5.99
Fabric: $5.00 (and about half a yard left)
Batting: $4.00 (half price!!! and a TON left!)
Wood: Already owned
Adhesive: Already owned
Staple gun: Already owned
= $14.99 

So there you go. It's not as luxurious as the chartreuse leather/nail head mirror, but it was a fun little project that brought a nice pop of color into my foyer. And I love it.

Sunday, March 11, 2012

Perfect weekend, Instagram style =)

Epic husband & puppy goofiness.

No one's cat is as gorgeous as Buddy.

Sleepy puppy.

Lunch special (+ pickles) at the Hook.

The only acceptable way to eat fries is to douse them in hot sauce.

A sunny day means froyo. Topped with fruit. And cinnamon toast crunch.

Window shopping. Fell in love with this distressed pink sideboard.

And this amazing hammered table. (Both at Coming Home Interiors.)

Finally did something that inspired me on Pinterest AGES ago.

Buddy was especially michievious Sunday morning.

My awesome husband made us IHOP copycat pancakes, bacon & tea =)

Finally hung some of our beautiful wedding pictures in a display we LOVE.

Hope everyone else had a fabulous weekend!

Friday, November 4, 2011

$4.38 piece of art

I'm sure anyone on Pinterest has seen this pinned about 1,000 times.


My friend Amber has even made one. Hers, and the ones that have been repinned look great, but it never wowed me enough to try it for myself. I wanted to try something different. Something more geometric and something with more color. I initially thought about just painting certain sections certain color (and since I bought a two pack of canvases, I probably will at some point), but then I saw this:


Obviously this is a framed print, but the original poster was sharing ideas on how to reproduce art cheaply. This could very easily be reproduced with skinny painters tape, a canvas, a yardstick, some paint and foam wedge brushes.

To make this even cheaper, I reused some old wall paint. I have quite a bit left from my summer of painting so I figured I'd give it a shot. I know you should use oil or acrylic, but if Sherry over at Young House Love can use wall paint, so can I.

Step One: Tape down your pattern. I measured, because I'm OCD, but you could totally freehand this for a more earthy pattern.


Step Two: Let your adorable cat "help". Actually what comes next is to take white paint and paint over the tape. This helps with paint smearing or leaking beneath the tape. It worked pretty well, but the lines were definitely not as crisp as I had hoped.


Step Three: Paint! I used foam brushes, because those are easier to handle when you're painting in a specific area.


Step Four: Remove the tape while the paint is still wet. Let dry and then display.


I'm very pleased with how it turned out! And it was SO cheap. Literally $4.38 on new supplies. The canvas was part of a value pack at Hobby Lobby. $7.99 for two, and then I had a 40% off coupon. And the pack of foam brushes were $1.99. All of the paint was left over from our bedroom wall and my epic wall. For the other one, I might go get a couple of the $2.00 sample pots of Glidden paint to add another color or two to it. Or I may do it in the exact same colors and hang them together.

Anyways... fun little project for a boring Thursday night at home =)

Wednesday, November 2, 2011

So pinteresting... the kitchen edition

I haven't done any cool projects or cooked anything fabulous lately. Why, you ask? I've been CRAZY busy. I went home last weekend to get some wedding stuff done. I had my first dress fitting, went for my cake tasting, and had the most amazing bridal shower. It was a wonderful weekend with good friends and family.

I'm also crazy busy because my husband will be home SOON (it always feels funny writing about wedding stuff when I'm already married, but oh well. For more of our story, go here... )! I have so many little things on my to-do list, as well as wedding projects, thank you notes, etc. Once he gets home though, the food and the projects will be back in full force. One of the first things we're going to do is remodel our kitchen. There are a few componets that are a must in the kitchen: a dark, bold blue backsplash, white cabinets, butcher block countertops, and a bold, creative light fixture for over our dining room table. It's going to be gorgeous and I can't wait to share the transformation!


google


With that being said, I'm going to link up some of the most amazing kitchens and some of the most awesome styling I've seen on Pinterest.

The navy backsplash, the white cabinets, the open shelves.... this kitchen is a dream!


I adore the backsplash. The turquoise is absolutely incredible and I love the glass doors on the cabinets.

The butcher block is INCREDIBLE and I adore the pet station in the island & the beautiful cabinetry.

All of this is stunning, ESPECIALLY the skylights. GORGEOUS.

The blue isn't dark enough, but this is so pretty.

Butcher block counters & white cabinets... stunning.

Our kitchen is a fraction of the size of any of these, but it's still going to be stunning when it's complete. I'm so excited! I'll post more photographs of the kitchen when we get started, but take a quick peek at the kitchen in all its... glory... as it was when Graham bought the house:


Ughhhhhhhhhhhhh. We have a lot of work ahead of us...

Sunday, September 25, 2011

DIY: Contact Paper Window Treatment

3/12/2014: Here is the contact paper I used for this project. Also, these shapes peel off VERY easily. At least they did for me. There was no sticky residue or marks on the glass. 


Pinterest strikes again.

Source

I saw the tutorial for this little project on Pinterest several times. Once I finally decided to start on the entry way, I knew it was exactly what the space needed.

I've become obsessed with the quatrefoil pattern, as you can tell by the epic wall and our gorgeous bedding. I want to incorporate it in our house as much as I can without it being overwhelming.

This "window treatment" was perfect. I didn't want blinds (boring!) and I didn't want to do curtains, because 1) it's a small window, and 2) I'm painting stripes on the wall and I figured curtains would either make the space too blah or too busy.It was also perfect because it was ridiculously cheap. The roll of contact paper was $6.50 at Home Depot and I only used about half of it.

It was time consuming. I printed out the template from 7th House on the Left on heavy cardstock, and then got to work tracing it onto the contact paper. This was SO boring. But, Frasier dvds and Buddy helped make it less mind numbing.

Obviously tracing on the paper side is recommended.

Such a good little helper =)

Okay, maybe not... but he's still cute =)

Anyways. Once I had about a gazillion shapes cut out, it was time to get to work. Want to see how ugly the area was when I got started?

Yeah. Sponge painted walls and the squares on the glass are drawn on...

Drawn on with blue Sharpie, nonetheless. Not to mention that last row is LOVELY.

Ugh. Anyways. Putting the shapes on the window was super easy. Peel that ugly crap off, clean the space well with Windex and then start adhering the pieces. The only thing that was challenging was being careful enough not to get air bubbles under the paper. I plopped a couple on and at first glance they looked fine. But when I stepped back, I could see so many air bubbles. So, I peeled those up and began slowly, and more carefully putting them on. It probably took about an hour to get them all up, but when I was finished I was so pleased with the end result.

You'll also notice the hideous paint job is now gone...

Close up of the finished product


This is SUCH a big improvement in our foyer. I still have a lot of work to do. I'm painting white stripes on the (now) pale gray walls, painting the trim a crisp & clean white and the door bright blue. When Graham get's home, we're also going to try and find (or make) an awesome light fixture to replace the old fashioned and boring one currently there. I got the first coat of the stripes done today, so hopefully I'll finish that next weekend!

(And these just because I'm obsessed with Instagram. And my cat.)